Building a Small Plywood Fishing Boat at Home: A Step-by-Step Guide
For anglers seeking a more intimate connection with the water, building a small plywood fishing boat at home can be an immensely rewarding and fulfilling experience. This project combines the satisfaction of crafting a functional vessel with the thrill of embarking on solo fishing expeditions.
This comprehensive guide will lead you through every step of the construction process, from initial design considerations to the final finishing touches. While this project requires some woodworking skills and a basic understanding of boat building principles, it's achievable with dedication and the right tools.
Choosing the Right Design
The first step is to decide on a design that best suits your needs and skill level. There are several beginner-friendly designs available online and in boat building books.
Factors to Consider:
- Size: Determine the ideal length and beam for your fishing needs and the waters you plan to navigate. A smaller boat, like a 10-foot dinghy, is excellent for lakes and calm rivers, while a larger 14-foot skiff might be better for coastal waters.
- Stability: Choose a design with a wide beam and a shallow draft for enhanced stability, especially if you're fishing alone.
- Portability: Consider the weight and size when choosing a design, especially if you need to transport it.
- Durability: Select a design using marine-grade plywood and construction techniques that withstand the rigors of water and weather.
Gathering Essential Materials
Once you've chosen your design, gather the necessary materials. You'll need:
Plywood:
- Marine-grade plywood (¼†or ½†thickness) for the hull and decks
- Exterior-grade plywood for internal structure and support
Lumber:
- Pressure-treated lumber for keel, stringers, and transom
- Cedar or mahogany for trim and decorative elements (optional)
Other Materials:
- Marine-grade epoxy resin and hardener
- Fiberglass cloth
- Wood screws (galvanized or stainless steel)
- Marine-grade sealant
- Marine paint (primer, bottom paint, and topcoat)
- Hardware: oars, oarlocks, rowlocks, cleats, and other necessary fittings
Building the Boat: A Step-by-Step Guide
Now, let's delve into the construction process, starting with the keel and frame:
Step 1: Constructing the Keel
- Cut the keel to the specified length using a table saw or circular saw.
- If your design calls for a curved keel, use a jigsaw or band saw to carefully shape it.
- Use epoxy resin and fiberglass cloth to reinforce the keel for increased strength.
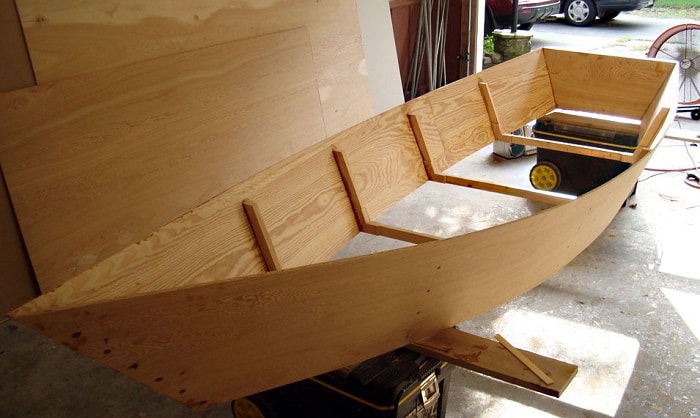
Step 2: Framing the Boat
- Cut the stringers (longitudinal supports) and frames (transverse supports) to the specified lengths and angles.
- Attach the stringers to the keel, using epoxy resin and screws.
- Attach the frames to the stringers and keel, ensuring proper alignment and spacing.
- Use marine-grade sealant to create watertight connections.
Step 3: Building the Hull
- Cut plywood panels to the required shapes for the hull, using a table saw, circular saw, or jigsaw.
- Attach the hull panels to the frame, starting with the bottom panels and working upwards.
- Use screws and epoxy resin to securely fasten the panels.
- Ensure a watertight fit by carefully sealing all seams with epoxy resin and marine-grade sealant.
Step 4: Constructing the Deck
- Cut the plywood panels for the deck, ensuring they fit snugly on the hull.
- Secure the deck panels to the frame, using screws and epoxy resin.
- Construct any necessary internal compartments or storage areas.
- Apply marine-grade sealant to all seams.
Step 5: Adding the Transom
- Cut the transom to the specified size and shape, ensuring it fits securely against the hull and deck.
- Attach the transom to the frame, using screws, epoxy resin, and marine-grade sealant.
- If you're installing an outboard motor, ensure the transom is strong enough to support its weight.
Finishing the Boat: Adding the Final Touches
With the boat's structure complete, it's time to add those final touches that transform it from a mere wooden frame to a functional and aesthetically pleasing vessel.
Step 6: Finishing the Exterior
- Sand the hull and deck thoroughly, removing any rough edges or imperfections.
- Apply a marine-grade primer to all surfaces, ensuring even coverage.
- Apply a layer of marine-grade bottom paint to the hull, providing protection against marine growth.
- Apply two or more coats of marine-grade topcoat to the hull and deck, achieving a durable and aesthetically pleasing finish.
Step 7: Installing Hardware and Accessories
- Attach cleats, oarlocks, rowlocks, and other necessary fittings to the boat.
- Install seats, storage compartments, or any other desired features.
- Mount an outboard motor to the transom, if applicable.
Testing and Launching Your New Boat
After completing the finishing touches, it's time to test your new boat. Start by conducting a thorough inspection to ensure all connections are secure and watertight. Perform a "float test" in a calm body of water, ensuring the boat is stable and floats correctly.
Once satisfied, it's time to launch your creation! Take it out on the water and enjoy the thrill of fishing from your handmade boat. Remember to always exercise caution, wear appropriate safety gear, and respect the waters you navigate.
Conclusion
Building a small plywood fishing boat at home is a rewarding project that combines craftsmanship with the joy of fishing. By following this comprehensive guide, you can bring your vision to life, creating a vessel that embodies your individual style and enhances your fishing adventures. Remember, patience, attention to detail, and a passion for the water will be your most valuable tools in this exciting journey.

0 comments:
Post a Comment
Note: Only a member of this blog may post a comment.