Friday, November 22, 2024

How to Build a Fishing Boat: Materials and Construction Tips

How to Build a Fishing Boat: Materials and Construction Tips

Building Your Own Fishing Boat: From Dream to Reality

So, you've got the itch to build your own fishing boat. It's a dream shared by many anglers, and it's a project that can be incredibly rewarding. You'll learn a ton, get your hands dirty, and end up with a vessel perfectly tailored to your needs. This guide will walk you through the process, from choosing the right materials to tackling the construction, keeping it conversational and practical throughout. Let's get started!

Choosing the Right Materials

The heart of your boat is the materials, so it's crucial to choose the right ones. This depends heavily on the boat's intended use, size, and your skill level.

Hull Material

The hull is the backbone of your boat, and it's where you have the most choices.

  • Fiberglass: Fiberglass is a popular choice for its durability, lightweight nature, and ease of repair. It's also relatively affordable. However, it requires some expertise in working with resins and layers.
  • Aluminum: Aluminum is known for its toughness, corrosion resistance, and ease of welding. It's great for saltwater use and can be a good choice for beginners due to its forgiving nature.
  • Wood: Wood has been a traditional material for boat building for centuries. It's strong, aesthetically pleasing, and offers excellent craftsmanship opportunities. However, it requires more maintenance and is more susceptible to rot and damage.
  • Plywood: Marine plywood is a lightweight and affordable option. It's commonly used for smaller boats and can be readily shaped. It requires a good sealant to prevent water damage.
  • Plastic: Plastic hulls are becoming more common. They're incredibly durable, lightweight, and require minimal maintenance. However, they can be expensive and might not be as easily repaired.

Other Materials

Beyond the hull, you'll need various other materials for your boat:

  • Deck: For the deck, you can use materials like wood, fiberglass, or aluminum, depending on your design and budget.
  • Hardware: This includes cleats, rails, hatches, and other fittings. Choose marine-grade hardware for maximum durability.
  • Engine: The engine is the heart of your boat. You'll need to consider its power, fuel efficiency, and weight when making your selection.
  • Electrical System: Your boat will need a basic electrical system, including wiring, batteries, switches, and lights.

Understanding Boat Plans

Don't jump into building without a plan. Boat plans are crucial for success. These are blueprints that outline the dimensions, construction techniques, and materials needed. Here's what to consider:

  • Type of Boat: Do you want a skiff, a pontoon, a runabout, or something else? This will determine the plan you need.
  • Size and Capacity: Choose a plan that suits the size and carrying capacity you require.
  • Skill Level: Consider your skill level when choosing a plan. Some plans are more complex than others.
  • Cost: Different plans will have different material requirements, influencing the overall cost.

You can find boat plans from various sources, including:

  • Online Retailers: Many websites specialize in selling boat plans.
  • Boat Building Magazines: Magazines often feature plans for a variety of boats.
  • Boat Clubs and Associations: Local boat clubs or associations might offer plans or resources for boat building.

Construction Steps

With your materials chosen and your plans in hand, you're ready to start building! Here's a general overview of the construction process:

Step 1: Framing and Hull

Start by building the framing of your boat. This typically involves cutting and assembling wood or aluminum frames according to your plans. Once the frame is complete, you can start laying down the hull material. This can involve layering fiberglass, bending aluminum sheets, or attaching plywood panels. Be sure to use the right adhesives, resins, and techniques for your chosen material.

Step 2: Deck and Cabin (if applicable)

Once the hull is complete, you can build the deck and any cabin or structure above it. This involves similar steps to building the hull, including framing and attaching your chosen deck material. Make sure to carefully seal any seams or joints to prevent leaks.

Step 3: Installing Hardware and Fittings

Now it's time to install all the hardware you need, including cleats, rails, hatches, and other fittings. Use the right screws, bolts, and washers to ensure everything is securely fastened. You'll also need to install your electrical system, including wiring, batteries, and switches.

Step 4: Engine Installation

With your hull, deck, and hardware complete, you can install your engine. Make sure you have the right mounting brackets and transom setup for your chosen engine type. This step might require additional support or consultation with a marine mechanic.

Step 5: Finishing and Painting

Finally, you can apply your chosen paint or varnish to protect your boat's exterior and give it a beautiful finish. Remember to use marine-grade products designed for durability and weather resistance.

Safety First!

Safety should be your top priority during the construction process. Always wear appropriate safety gear, including goggles, gloves, and a respirator. Work in a well-ventilated area and follow the manufacturer's instructions for any chemicals or tools you're using.

Also, be aware of the risks involved in working with power tools and ensure you have the proper training and experience before using them. If you're unsure about a specific task, don't hesitate to seek help from a professional.

Tips for Successful Boat Building

  • Start Small: If you're a beginner, don't start with a large, complex boat. Choose a smaller, simpler design to gain experience.
  • Take Your Time: Boat building is a labor of love. Don't rush the process. Take your time, do your research, and pay attention to detail.
  • Don't Be Afraid to Ask for Help: There are many resources available for boat builders, including online forums, boat clubs, and experienced boat builders. Don't be afraid to ask for advice when you need it.
  • Document Everything: Keep a detailed record of your project, including measurements, materials used, and any challenges you encounter. This will help you troubleshoot problems and improve your skills for future projects.

Commonly Asked Questions

Here are some common questions that boat builders often have:

How much does it cost to build a boat?

The cost of building a boat varies widely depending on the size, materials, and complexity of your project. For a smaller, simpler boat, you might be able to build it for a few thousand dollars. But for a larger, more complex boat, the cost could easily reach tens of thousands of dollars.

How long does it take to build a boat?

The construction time also depends on the size and complexity of your project. A smaller boat might take a few months, while a larger boat could take several years.

Do I need any special skills to build a boat?

While it's helpful to have some basic woodworking or metalworking skills, it's not essential. Many boat plans are designed for beginners and provide detailed instructions. You can also learn new skills as you go along.

Where can I find help with boat building?

There are many resources available for boat builders, including:

  • Online forums: There are many active forums online where you can ask questions and get advice from experienced boat builders.
  • Boat clubs and associations: Local boat clubs and associations often offer workshops and resources for members.
  • Boat building books and magazines: These provide information on boat design, construction techniques, and materials.
  • Boat building schools: Some schools offer courses in boat building.

Building your own fishing boat is a challenging but rewarding experience. With patience, perseverance, and a good set of plans, you can turn your dream into a reality. Enjoy the process and the pride of owning a boat that you built yourself!
Thursday, November 21, 2024

How to Make a Small Plywood Fishing Boat at Home

How to Make a Small Plywood Fishing Boat at Home

Building a Small Plywood Fishing Boat at Home: A Step-by-Step Guide

For anglers seeking a more intimate connection with the water, building a small plywood fishing boat at home can be an immensely rewarding and fulfilling experience. This project combines the satisfaction of crafting a functional vessel with the thrill of embarking on solo fishing expeditions.

This comprehensive guide will lead you through every step of the construction process, from initial design considerations to the final finishing touches. While this project requires some woodworking skills and a basic understanding of boat building principles, it's achievable with dedication and the right tools.

Choosing the Right Design

The first step is to decide on a design that best suits your needs and skill level. There are several beginner-friendly designs available online and in boat building books.

Factors to Consider:

  • Size: Determine the ideal length and beam for your fishing needs and the waters you plan to navigate. A smaller boat, like a 10-foot dinghy, is excellent for lakes and calm rivers, while a larger 14-foot skiff might be better for coastal waters.
  • Stability: Choose a design with a wide beam and a shallow draft for enhanced stability, especially if you're fishing alone.
  • Portability: Consider the weight and size when choosing a design, especially if you need to transport it.
  • Durability: Select a design using marine-grade plywood and construction techniques that withstand the rigors of water and weather.

Gathering Essential Materials

Once you've chosen your design, gather the necessary materials. You'll need:

Plywood:

  • Marine-grade plywood (¼” or ½” thickness) for the hull and decks
  • Exterior-grade plywood for internal structure and support

Lumber:

  • Pressure-treated lumber for keel, stringers, and transom
  • Cedar or mahogany for trim and decorative elements (optional)

Other Materials:

  • Marine-grade epoxy resin and hardener
  • Fiberglass cloth
  • Wood screws (galvanized or stainless steel)
  • Marine-grade sealant
  • Marine paint (primer, bottom paint, and topcoat)
  • Hardware: oars, oarlocks, rowlocks, cleats, and other necessary fittings

Building the Boat: A Step-by-Step Guide

Now, let's delve into the construction process, starting with the keel and frame:

Step 1: Constructing the Keel

  • Cut the keel to the specified length using a table saw or circular saw.
  • If your design calls for a curved keel, use a jigsaw or band saw to carefully shape it.
  • Use epoxy resin and fiberglass cloth to reinforce the keel for increased strength.

Step 2: Framing the Boat

  • Cut the stringers (longitudinal supports) and frames (transverse supports) to the specified lengths and angles.
  • Attach the stringers to the keel, using epoxy resin and screws.
  • Attach the frames to the stringers and keel, ensuring proper alignment and spacing.
  • Use marine-grade sealant to create watertight connections.

Step 3: Building the Hull

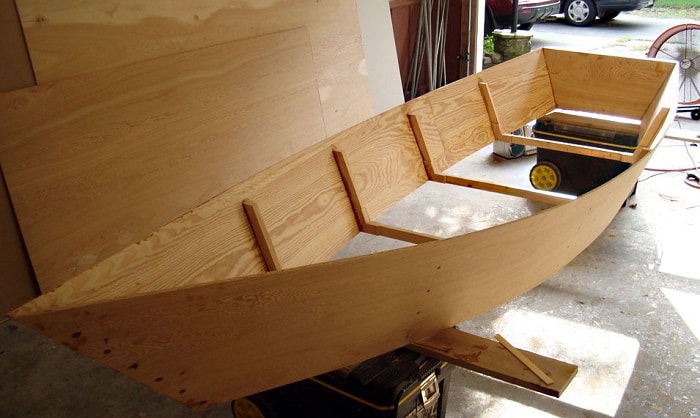
  • Cut plywood panels to the required shapes for the hull, using a table saw, circular saw, or jigsaw.
  • Attach the hull panels to the frame, starting with the bottom panels and working upwards.
  • Use screws and epoxy resin to securely fasten the panels.
  • Ensure a watertight fit by carefully sealing all seams with epoxy resin and marine-grade sealant.

Step 4: Constructing the Deck

  • Cut the plywood panels for the deck, ensuring they fit snugly on the hull.
  • Secure the deck panels to the frame, using screws and epoxy resin.
  • Construct any necessary internal compartments or storage areas.
  • Apply marine-grade sealant to all seams.

Step 5: Adding the Transom

  • Cut the transom to the specified size and shape, ensuring it fits securely against the hull and deck.
  • Attach the transom to the frame, using screws, epoxy resin, and marine-grade sealant.
  • If you're installing an outboard motor, ensure the transom is strong enough to support its weight.

Finishing the Boat: Adding the Final Touches

With the boat's structure complete, it's time to add those final touches that transform it from a mere wooden frame to a functional and aesthetically pleasing vessel.

Step 6: Finishing the Exterior

  • Sand the hull and deck thoroughly, removing any rough edges or imperfections.
  • Apply a marine-grade primer to all surfaces, ensuring even coverage.
  • Apply a layer of marine-grade bottom paint to the hull, providing protection against marine growth.
  • Apply two or more coats of marine-grade topcoat to the hull and deck, achieving a durable and aesthetically pleasing finish.

Step 7: Installing Hardware and Accessories

  • Attach cleats, oarlocks, rowlocks, and other necessary fittings to the boat.
  • Install seats, storage compartments, or any other desired features.
  • Mount an outboard motor to the transom, if applicable.

Testing and Launching Your New Boat

After completing the finishing touches, it's time to test your new boat. Start by conducting a thorough inspection to ensure all connections are secure and watertight. Perform a "float test" in a calm body of water, ensuring the boat is stable and floats correctly.

Once satisfied, it's time to launch your creation! Take it out on the water and enjoy the thrill of fishing from your handmade boat. Remember to always exercise caution, wear appropriate safety gear, and respect the waters you navigate.

Conclusion

Building a small plywood fishing boat at home is a rewarding project that combines craftsmanship with the joy of fishing. By following this comprehensive guide, you can bring your vision to life, creating a vessel that embodies your individual style and enhances your fishing adventures. Remember, patience, attention to detail, and a passion for the water will be your most valuable tools in this exciting journey.

How to Build a Small Plywood Dinghy for Family Use

How to Build a Small Plywood Dinghy for Family Use

Building a Small Plywood Dinghy for Family Fun

Embark on a rewarding DIY project by constructing a small plywood dinghy, a versatile and enjoyable vessel for family adventures on the water. This comprehensive guide will walk you through the entire process, from planning and material selection to assembly and finishing, equipping you with the knowledge and skills to create a safe and durable boat.

Planning and Design

Determine Your Needs

Before you dive into the project, it's essential to clarify your intended use and the size of your family. Consider the following factors:

  • Number of passengers: How many people will be aboard, including adults and children?
  • Water conditions: Will you be sailing on calm lakes or venturing into more turbulent waters?
  • Storage space: How will you store the boat when not in use?
  • Budget: Set a realistic budget for materials and tools.

Choosing a Design

Numerous dinghy designs are available, each with unique characteristics. Consider these popular options:

  • Tender dinghy: A small, lightweight boat ideal for short trips and carrying a few people.
  • Rowboat: A classic design suitable for both rowing and sailing, with a longer hull and more capacity.
  • Sailing dinghy: Designed specifically for sailing, with a sail rig and daggerboard for stability.

Selecting Materials

Plywood is an excellent choice for dinghy construction due to its affordability, strength, and ease of working. Choose marine-grade plywood, specifically designed for water exposure and resistance to rot and moisture.

  • Thickness: 1/4 inch (6mm) or 3/8 inch (9mm) plywood is generally sufficient for small dinghies.
  • Species: Common choices include marine-grade plywood made from cedar, mahogany, or spruce.

Other essential materials include:

  • Epoxy resin and hardener: For bonding plywood panels and creating a waterproof seal.
  • Fiberglass cloth: To reinforce the hull and improve durability.
  • Wood screws and fasteners: For assembling the boat's frame.
  • Paint or varnish: To protect the wood and enhance aesthetics.
  • Oars or paddles: For propulsion.
  • Seats or benches: For passenger comfort.

Construction

Building the Frame

Begin by constructing the frame using marine-grade plywood and wood screws or fasteners. You'll need to create the following components:

  • Transom: The rearmost section of the boat, supporting the outboard motor or oars.
  • Stem: The forwardmost section of the boat, defining the bow.
  • Side planks: Panels that form the sides of the hull.
  • Floorboards: Panels that form the bottom of the boat.

Cut the plywood panels to size using a jigsaw or circular saw. Ensure precise measurements and clean cuts for a smooth assembly.

Gluing and Fiberglassing

Once the frame is assembled, apply epoxy resin and hardener to bond the plywood panels together. Allow the resin to cure completely before proceeding.

After curing, apply fiberglass cloth to the exterior of the hull, ensuring a smooth and even layer. Saturate the cloth with epoxy resin and allow it to cure thoroughly. This process adds strength and water resistance to the dinghy.

Finishing and Details

After the fiberglass has cured, sand the hull smooth and prepare it for painting or varnishing. Choose a marine-grade paint or varnish designed for water exposure and durability.

Install seats, benches, and any other desired features. Add oarlocks or motor mounts, depending on your propulsion method.

Safety and Regulations

Prior to launching your homemade dinghy, ensure it meets all safety regulations for your region. Consider the following:

  • Life jackets: Provide life jackets for all passengers and wear them when boating.
  • Navigation lights: Equip your dinghy with navigation lights if operating at night or in low-visibility conditions.
  • Registration: Check with your local authorities regarding registration requirements for small boats.

Always inspect your dinghy for any signs of damage or wear before each use. Replace or repair any damaged parts immediately.

Conclusion

Building a small plywood dinghy is a rewarding DIY project that allows you to create a valuable asset for family fun on the water. With careful planning, attention to detail, and adherence to safety regulations, you can enjoy a safe and enjoyable boating experience for years to come.

Remember, this guide provides a general overview of the process. Consult detailed plans and instructions from reputable boatbuilding resources for specific guidance tailored to your chosen design.

Dinghy Plans for Reliable and Long-Lasting Wooden Boats

Dinghy Plans for Reliable and Long-Lasting Wooden Boats

Dinghy Plans for Reliable and Long-Lasting Wooden Boats

The allure of a wooden dinghy lies in its timeless elegance and inherent craftsmanship. These boats, with their graceful lines and natural beauty, offer a connection to a bygone era of maritime tradition. But beyond aesthetics, wooden dinghies are renowned for their durability and longevity. Their inherent strength and ability to be repaired easily ensure they can withstand the test of time, becoming cherished heirlooms passed down through generations. If you're looking to build your own wooden dinghy, this article will guide you through the best plans that guarantee reliability and longevity.

Choosing the Right Plans

The first step in building a wooden dinghy is selecting the right plans. This crucial decision lays the foundation for your project, dictating the boat's overall design, size, and performance. When choosing plans, consider your skill level, available resources, and intended use. Here are some key factors to keep in mind:

Design and Style

Wooden dinghies come in various designs, each with its unique characteristics. Some popular choices include the classic clinker-built dinghy with overlapping planks, the carvel-built dinghy with smooth, flush-fitting planks, and the modern plywood dinghy, known for its ease of construction. Choose a design that appeals to your aesthetic preferences and suits your intended use.

Size and Dimensions

The size of your dinghy will determine its carrying capacity, stability, and ease of handling. Consider the number of people and equipment you'll be carrying and the type of waters you'll be navigating. Consult with experienced boatbuilders or online resources for guidance on selecting the right size.

Construction Techniques

Wooden dinghies can be built using various construction techniques, each with its own advantages and disadvantages. Clinker-built boats offer superior strength and watertightness but require advanced skills. Carvel-built boats are more aesthetically pleasing but can be more challenging to build. Plywood dinghies are relatively easy to construct and offer a good balance of strength and aesthetics.

Recommended Plans for Reliable and Long-Lasting Wooden Dinghies

With countless plans available, selecting the right ones for your wooden dinghy project can be daunting. Here are some highly recommended plans known for their reliability and longevity:

The "Classic" Plans

  • The "Cape Dory 15" by Ted Hood: This classic design features a sturdy clinker-built construction, excellent stability, and a timeless aesthetic. It's a popular choice for both beginners and experienced builders.
  • The "Scamp" by John Harris: A simple and elegant design, the Scamp features a carvel-built construction with a shallow draft, making it ideal for exploring shallow waters. Its versatility makes it suitable for both rowing and sailing.

Modern Plans for Easy Construction

  • The "West Wight Potter 15" by John Leather: A proven design known for its ease of construction and excellent performance, the Potter 15 features a plywood construction that makes it accessible to builders of all skill levels.
  • The "Drascombe Lugger" by John Leather: This versatile dinghy offers a unique combination of traditional aesthetics and modern construction techniques, making it a great choice for those seeking a classic feel with a modern twist.

Materials and Construction Techniques for Durability

Once you've chosen your plans, selecting the right materials and employing appropriate construction techniques is crucial to ensuring your wooden dinghy's durability. Here are some key considerations:

Wood Selection

For wooden dinghies, selecting the right wood is paramount. Traditionally, boatbuilders have used cedar, mahogany, and oak for their strength, durability, and resistance to rot. However, other woods like pine and fir can also be used, especially for plywood construction. Always choose wood that is well-seasoned and free of defects for optimal performance.

Fasteners

The type of fasteners you use can significantly affect the durability of your wooden dinghy. Copper or bronze fasteners are ideal for their corrosion resistance. Stainless steel fasteners can also be used, but ensure they are marine-grade quality. Avoid using galvanized fasteners as they can corrode over time and damage the wood.

Epoxy and Coatings

Epoxy is essential for sealing the wood and providing a waterproof barrier. It strengthens the joints and protects the wood from water damage. After epoxy application, a good quality marine paint or varnish is crucial for protecting the wood from the elements and extending its lifespan. Several types of marine paint are available, each with its own advantages and disadvantages. Choose a paint that is suitable for your boat's intended use and the environmental conditions it will be exposed to.

Maintenance and Care

Even with meticulous construction, wooden dinghies require regular maintenance to ensure their longevity. A few key practices will help keep your boat in top condition:

Regular Inspection

Inspect your dinghy regularly for signs of wear and tear. Check the hull for cracks, blisters, and loose fasteners. Examine the wood for signs of rot or moisture damage. Early detection of these problems allows for timely repairs and prevents further damage.

Cleaning and Drying

After each use, clean your dinghy thoroughly with fresh water to remove any salt or debris. Allow it to dry completely before storing it. This will help prevent the growth of mold and mildew and extend the life of the wood.

Re-coating

Over time, the paint or varnish on your dinghy will start to wear. Re-coat your boat every few years to protect the wood and maintain its aesthetic appeal. This will also help prevent the penetration of moisture and damage to the wood.

Building a wooden dinghy is a rewarding and fulfilling experience. By choosing the right plans, using high-quality materials, and following proper construction and maintenance techniques, you can create a boat that will provide years of enjoyment and become a cherished family heirloom. The beauty of a wooden dinghy lies not only in its timeless elegance but also in its durability and ability to withstand the test of time. With proper care and maintenance, your wooden dinghy will be a testament to the art of boatbuilding and a source of pride for generations to come.

Wooden Sailboat Plans for Coastal and Inland Sailing

Wooden Sailboat Plans for Coastal and Inland Sailing

Wooden Sailboat Plans: Embark on Your Own Nautical Adventure

For generations, the allure of the sea has captivated adventurers and dreamers alike. The rhythmic sway of the waves, the crisp scent of salt air, and the freedom of sailing on a wooden vessel are experiences that transcend time. If you harbor a longing to build your own sailboat, the journey begins with a set of well-crafted plans. Wooden sailboat plans provide the blueprint for your maritime masterpiece, guiding you step-by-step through the creation of a vessel that will carry you across the waves.

Choosing the right plans for your project is essential. Consider your skill level, available resources, and the type of sailing experience you envision. Do you dream of gliding along tranquil inland waterways or braving the open ocean? Each location demands a different type of boat, and each plan caters to specific needs.

Types of Wooden Sailboat Plans

The world of wooden sailboat plans is as diverse as the waters they are meant to navigate. From small dinghies to majestic schooners, plans cater to every sailor's ambition. Here are some popular categories to guide your selection:

Day Sailors

For casual weekend outings and exploring nearby waters, day sailors offer a delightful blend of simplicity and seaworthiness. These compact boats are typically easy to build and maneuver, making them ideal for beginners or those seeking a leisurely sailing experience.

Cruising Sailboats

If you dream of longer voyages and coastal cruising, cruising sailboats provide the space and amenities for extended adventures. These larger vessels offer accommodations for sleeping, cooking, and navigating for days or even weeks on end.

Racing Sailboats

For those seeking the thrill of competition, racing sailboats are designed for speed and maneuverability. Their streamlined hulls and high-performance sails are optimized for outperforming rivals on the racecourse.

Choosing the Right Plan

Selecting the perfect plan for your wooden sailboat project is a pivotal step. Here are some factors to consider:

  • Skill Level: Assess your woodworking abilities and choose plans that match your experience. Beginner-friendly plans often offer simplified designs and detailed instructions.
  • Sailing Experience: Consider your level of sailing expertise. If you're new to sailing, a smaller, easier-to-handle boat might be more appropriate.
  • Location: Think about where you'll be sailing. Coastal waters often require more robust vessels than inland lakes or rivers.
  • Budget: Plans vary in cost, depending on their complexity and the materials required. Set a realistic budget and choose plans that align with your financial constraints.

Building Your Wooden Sailboat

Once you've chosen your plans, the exciting process of building your sailboat begins. The steps involved vary depending on the chosen design, but here's a general overview:

  • Materials: Procure the necessary materials, including wood, fasteners, hardware, and paints.
  • Cutting and Shaping: Carefully cut and shape the wood according to the plans. Precision is crucial for ensuring a well-built vessel.
  • Assembly: Assemble the hull, deck, and interior components as outlined in the plans. This step may involve using jigs, templates, and other tools for accuracy.
  • Finishing: Once the boat is assembled, finish it with paint, varnish, and other coatings to protect the wood and enhance its appearance.
  • Rigging: Install the mast, sails, rigging, and other equipment needed for sailing.

Where to Find Wooden Sailboat Plans

Numerous resources offer wooden sailboat plans. Some popular options include:

  • Online Retailers: Websites specializing in boat plans offer a wide selection of designs, from classic to modern styles.
  • Boatbuilding Magazines: Magazines dedicated to boatbuilding often feature plans and articles on wooden sailboat construction.
  • Boat Shows: Boat shows frequently feature vendors selling wooden sailboat plans.
  • Boatbuilding Associations: Organizations dedicated to boatbuilding may offer plans or resources for finding them.

Building a wooden sailboat is a challenging yet rewarding endeavor. It demands dedication, skill, and a love for the sea. But the satisfaction of creating a vessel with your own hands, one that you'll share with the waves and the winds, is an accomplishment that will last a lifetime.

How to Build a Powerboat for Safe and Fun Water Activities

How to Build a Powerboat for Safe and Fun Water Activities

Building a Powerboat for Safe and Fun Water Activities

Venturing onto the open water in your own powerboat is a dream shared by many. Building your own powerboat not only offers a sense of accomplishment but also allows you to customize it to perfectly suit your needs and preferences. This comprehensive guide will walk you through the process of building a powerboat, ensuring both safety and fun on the water.

Planning and Design

Before diving into construction, meticulous planning is crucial. Start by clearly defining the purpose of your boat. Are you looking for a leisurely cruising experience, high-speed thrills, or fishing adventures?

Boat Type and Size

Consider the size, shape, and type of boat that best aligns with your intended use. Small, open boats are perfect for fishing or leisurely outings, while larger, enclosed boats offer more space and protection from the elements. Research different hull designs, such as V-hulls, flat-bottomed hulls, and catamarans, to understand their characteristics and suitability for your needs.

Materials and Budget

Choose your materials wisely, balancing cost, durability, and weight. Fiberglass is a popular choice due to its strength, lightness, and affordability. Other options include aluminum, wood, and even inflatable materials. Develop a realistic budget, factoring in the cost of materials, tools, and any professional assistance you may need.

Construction Phase

With your design finalized, you can begin the construction phase. This involves assembling the hull, deck, and other structural components.

Building the Hull

The hull is the foundation of your boat. If using fiberglass, carefully lay up layers of resin-soaked fiberglass cloth onto a mold. Allow each layer to cure completely before adding the next. For wooden hulls, use strong, marine-grade plywood and fasten the planks using epoxy or marine-grade adhesives.

Deck Construction

The deck provides structure and walking space. Build the deck framework using wood or aluminum and then cover it with your chosen material. Ensure proper drainage for any water that may accumulate on the deck.

Engine Installation

Choose an engine that fits your boat’s size and intended use. Install the engine according to the manufacturer’s instructions, paying close attention to alignment and secure mounting. Consider the placement of the engine to ensure proper weight distribution and optimal performance.

Safety and Regulations

Building a safe powerboat is paramount. Adhere to all applicable boating regulations and safety standards.

Essential Safety Equipment

Equip your boat with essential safety gear, including:

  • Life jackets for all passengers
  • Fire extinguishers
  • Navigation lights
  • First aid kit
  • Whistle or air horn
  • Navigation and Licensing

    Familiarize yourself with boating rules and regulations, including navigation laws, speed limits, and licensing requirements. Obtain any necessary licenses and registrations for your boat and engine.

    Finishing Touches and Testing

    Once the construction is complete, add finishing touches like paint, hardware, seating, and instrumentation.

    Testing and Refinement

    Before venturing out onto the water, perform thorough testing in a controlled environment. Make sure the engine runs smoothly, the boat handles well, and all systems are functioning correctly. Refine the design and performance based on your testing results.

    Enjoy Your New Powerboat

    With your powerboat built and safety measures in place, you’re ready to experience the thrill of cruising on the water. Remember to always prioritize safety and boat responsibly.

    Easy-to-Follow Wooden Kayak Plans for River Adventures

    Easy-to-Follow Wooden Kayak Plans for River Adventures

    Building Your Own Wooden River Kayak: An Easy Guide

    Have you ever dreamed of gliding down a peaceful river in a kayak you built yourself? It's a rewarding experience, and building a wooden kayak can be a fun and achievable project. It doesn't have to be intimidating â€" even a beginner can create a beautiful and functional kayak with the right plans and guidance. Let's get you started on your journey to paddling your very own wooden masterpiece!

    Choosing the Right Wooden Kayak Plans

    The first step is finding the right plans for your project. There are tons of options available, from free plans online to detailed, professional sets. Here's how to choose the perfect ones for you:

    Consider Your Skill Level

    Some plans are designed for beginners, while others are more complex and geared towards experienced woodworkers. If you're new to woodworking, start with simpler plans that use fewer parts and simpler techniques. You can always graduate to more challenging designs as you gain experience.

    Think About the Type of Kayak You Want

    Do you envision yourself paddling on calm lakes or braving rapids on wild rivers? There are plans for different kayak types, each with its own strengths and weaknesses. Consider these factors when choosing:

    • Length: Longer kayaks are faster and more stable but less maneuverable. Shorter kayaks are more agile but may be less stable.
    • Width: Wider kayaks are more stable, but narrower kayaks are faster and easier to maneuver.
    • Depth: Deeper kayaks are more stable in rough water, but shallower kayaks are easier to roll.

    Read Reviews and Check Out Examples

    Before committing to a set of plans, check out reviews from other builders. See if there are any common issues reported or if people have successfully built the kayak using those plans. It's also helpful to look at completed examples online to see if the design appeals to you.

    Gather the Necessary Materials

    Once you have your plans, you'll need to gather the necessary materials. The specific materials will vary depending on the plans you choose, but here are some common components:

    • Wood: Common choices include cedar, spruce, or mahogany. Cedar is lightweight and resistant to rot, making it a good option for kayaks. Spruce is also strong and lightweight, but it can be more prone to damage. Mahogany is a heavier wood, but it's very strong and durable.
    • Epoxy Resin: Epoxy is used to seal the wood and prevent water damage. It also helps to bind the layers of wood together.
    • Fiberglass Cloth: Fiberglass is used to strengthen the hull and prevent cracks. It's applied over the epoxy resin.
    • Hardware: This includes items like deck fittings, hatch covers, and seats. These items are usually purchased separately and are often made of plastic or metal.
    • Tools: You'll need a variety of tools for building a kayak, including saws, drills, sanders, and clamps. Check your plans to see the full list of tools you'll need.

    Building Your Wooden Kayak: Step-by-Step

    Building a wooden kayak is a process, but it's satisfying to watch it come together! The specific steps will vary based on your plans, but here's a general overview:

    1. Cutting the Wood

    Start by carefully cutting the wood according to your plans. Use a good quality saw and make sure your cuts are precise. You can use a table saw, circular saw, or even a hand saw, depending on your preference and the size of the pieces.

    2. Assembling the Hull

    The next step is to assemble the hull of the kayak. This involves joining the various wooden pieces together using epoxy resin and fiberglass cloth. Follow your plans carefully and work methodically. This is a crucial stage, so take your time and don't rush the process.

    3. Building the Deck

    Once the hull is complete, you can move on to the deck. This is typically made of a single sheet of wood or several smaller pieces joined together. The deck is often shaped to accommodate seats, hatches, and other deck fittings.

    4. Finishing and Refinement

    The final stage involves sanding, sealing, and finishing the kayak. This can be a time-consuming process, but it's crucial for making your kayak look its best and protecting it from the elements.

    Adding Personal Touches

    One of the great things about building a wooden kayak is the ability to add your own personal touches. You can choose the wood you want to use, the paint color, and even the design of the deck fittings. These small details can really make your kayak unique.

    Safety and Maintenance

    Before you take your wooden kayak out on the water, it's important to check that everything is secure and properly sealed. You should also learn some basic safety procedures, such as how to right a capsized kayak and how to use a personal floatation device (PFD). With a little preparation, you can enjoy safe and enjoyable paddling trips.

    Here are some tips for maintaining your wooden kayak:

    • Store your kayak properly: Avoid storing it in direct sunlight, which can cause the wood to dry out and crack.
    • Inspect the hull regularly: Check for any signs of damage, such as cracks or leaks.
    • Clean the kayak after each use: Rinse it with fresh water and dry it thoroughly to prevent mold and mildew.
    • Reseal the kayak periodically: If you notice any signs of cracking or leaks, re-seal the kayak with epoxy resin and fiberglass cloth.

    Commonly Asked Questions

    Here are some frequently asked questions about building wooden kayaks:

    Q: How long does it take to build a wooden kayak?

    The time it takes to build a wooden kayak will vary depending on your experience and the complexity of the plans. A simple kayak can be built in a few weeks, while a more complex one could take several months.

    Q: How much does it cost to build a wooden kayak?

    The cost of building a wooden kayak will also vary depending on the materials you choose. However, it is generally cheaper than buying a similar kayak commercially.

    Q: Do I need to have woodworking experience to build a wooden kayak?

    It helps to have some basic woodworking skills, but it's not essential. Many plans are designed for beginners, and there are plenty of resources available to help you learn the necessary techniques.

    Q: What are the benefits of building a wooden kayak?

    Building your own wooden kayak is a very rewarding experience. It allows you to customize your kayak to your exact specifications, and it gives you a deep appreciation for the craftsmanship involved in building a boat. Plus, you'll have the satisfaction of knowing that you built it yourself!

    So, what are you waiting for? Start planning your own wooden kayak adventure today!